How to run DoltLab on Microsoft Azure

Earlier this week Fjellwang, a DoltLab user on our Discord server, was kind enough to share a document he wrote detailing how he deployed DoltLab in Microsoft Azure Cloud. Well, we liked his doc so much we decided to turn it's own blog post!
With Fjellwang's permission, I've made a few minor modifications to the original content and reproduced the images specifically for this post, but otherwise, am sharing exactly what is in his doc. A huge thank you to Fjellwang for sharing with us, and we hope it helps you get your DoltLab up and running on Azure as well!
- Installing and Running DoltLab on an Azure VM
- Enable RDP access to the VM
- Using a remote PostgreSQL database
Installing and Running DoltLab on an Azure Virtual Machine (VM)
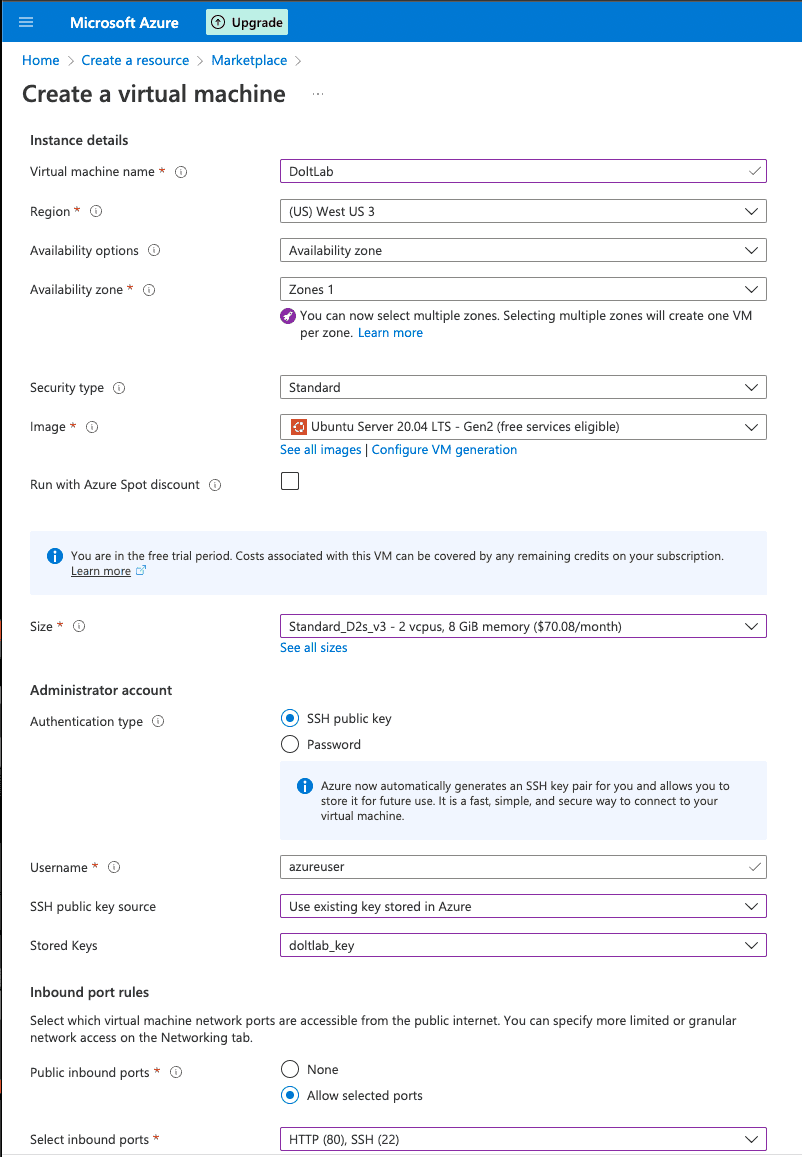
To start, you must first create a Microsoft Azure account and login to the Azure portal. Make sure you use a Firefox browser to create an account since account creation with Chrome... seems to just silently fail (I assume this is intentional 👀 😈 😂). Once logged in, click "Create a resource" and search for "Ubuntu Server".
For this example, I chose the Ubuntu Server 20.04 LTS option, but the 18.04 LTS version is also fine.

After choosing the VM type, go through the "Create a virtual machine" guided steps.
Choose your "Subscription", "Region" and "Resource Group".
Choose "Size" and "Performance tier" based on your DoltLab use case. Note, this can be scaled up later.
The "Username" entered will be used for accessing the VM once it's deployed.
For the "SSH public key source" field, you can use an existing SSH key by selecting "Use existing key stored in Azure", or you can generate a new SSH key by choosing "Generate new key pair". Generating a new key will prompt you to download a .pem -key file at the end of the setup. You will use this file to SSH into the VM.
For "Select inbound ports", select ports 80 and 22.
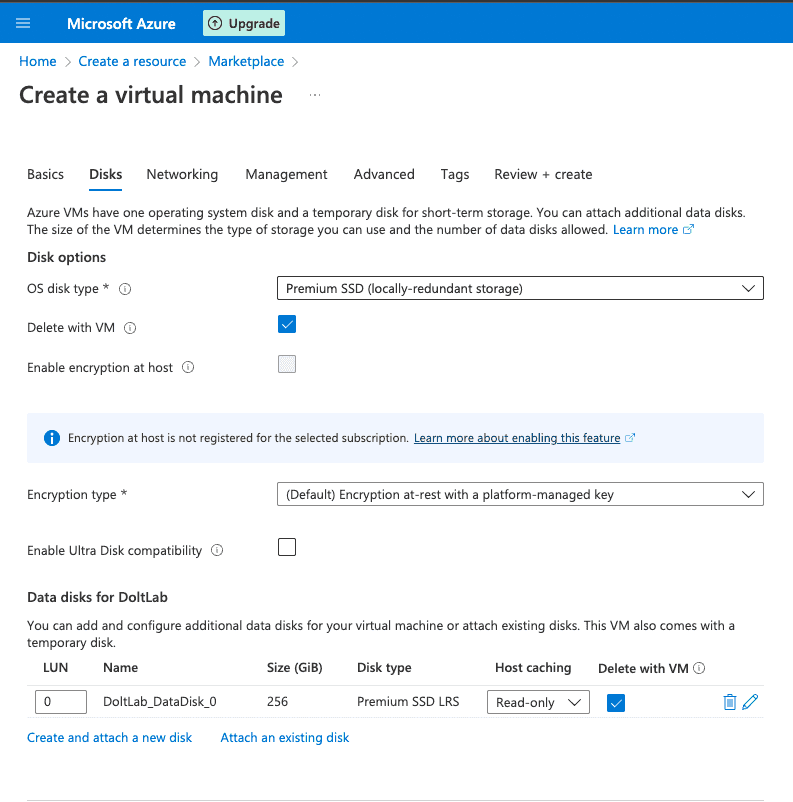
For disks, click “Create and attach a new disk” and select the desired size. For this example, we chose 256 GB.
For our example we can simply use the default settings in "Networking" tab. If you already have a virtual network set up on your Azure stack, that can be used instead. Otherwise, you click "Create new" to create a new Virtual network as prompted by the default settings.
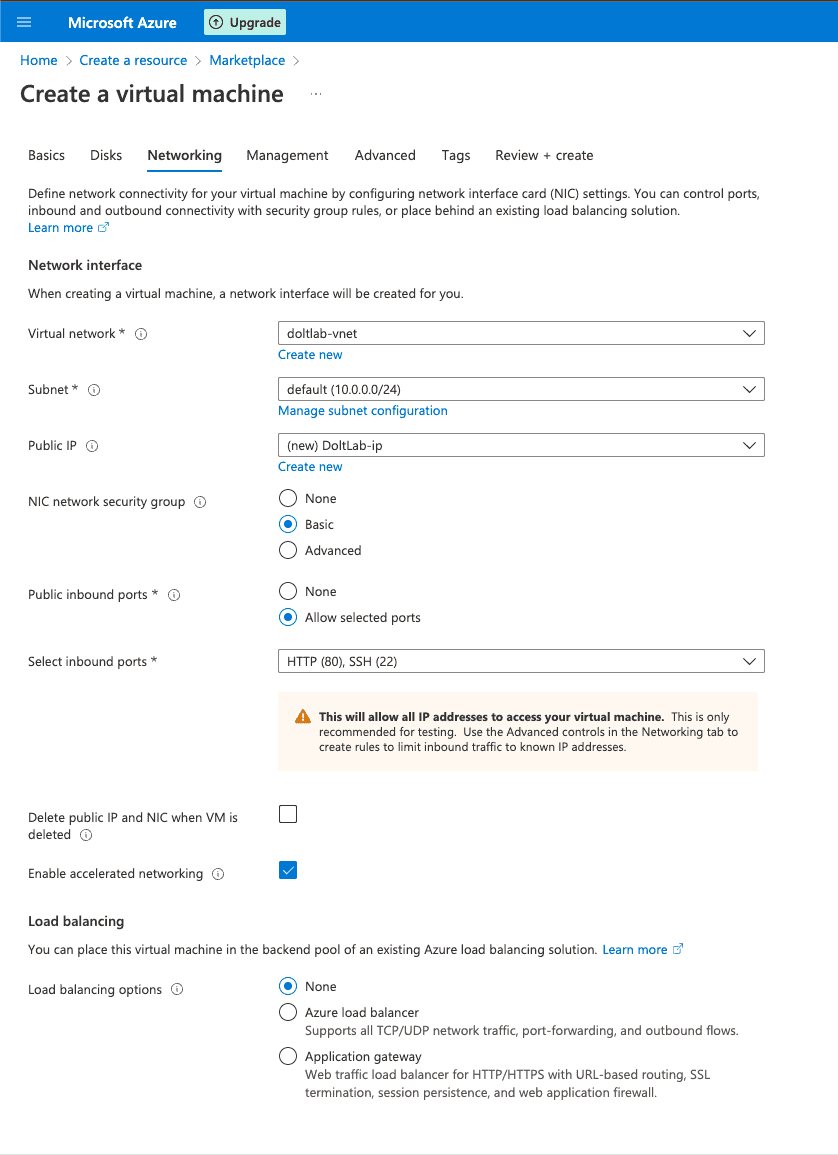
For the remaining VM setup steps, this example only requires only the default settings, so we can click “Review + Create” to start the deployment of the VM. If you chose to generate a new SSH key, you will also be prompted to download the SSH key .pem file.
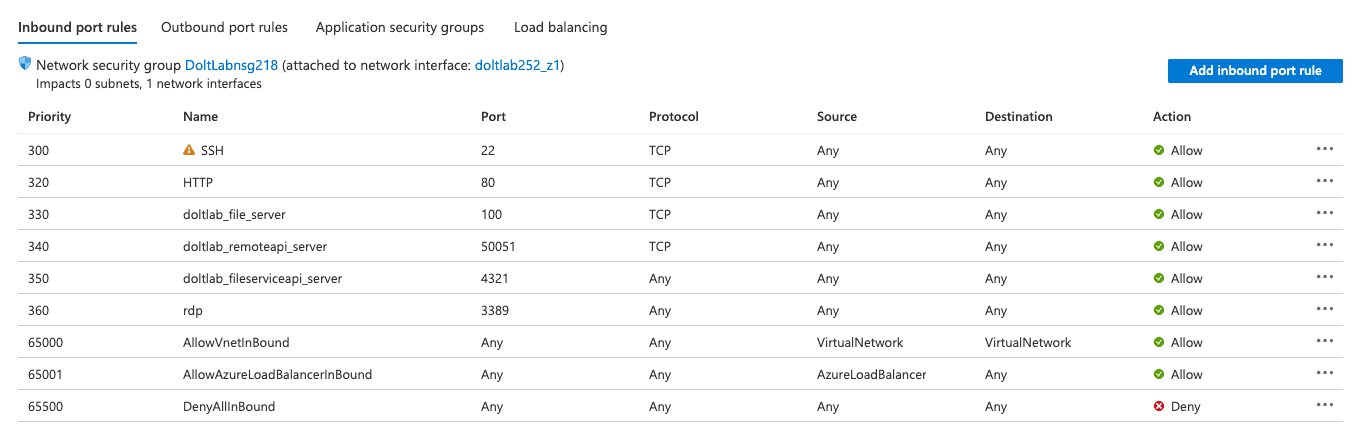
Once the VM is deployed, navigate to your newly created VM resource, and click “Networking”.
To run DoltLab, a few more ports need to be opened. Click “Add inbound port rule” to add new port rules and open ports 100, 50051, and 4321. We'll go ahead and also open port 3389 to enable remote desktop protocol (RDP) access to the VM. When you're done, the networking page should look something like this:
Now you're ready to connect to the VM!
Open up a terminal and connect the deployed VM by running:
ssh -i <path to ssh key> <vm azure username>@<vm public ip>Choose "yes" (press Enter) when prompted.
The commands that follow will install unzip, make, curl, docker, docker-compose and other dependencies used to run DoltLab's Docker containers.
sudo apt-update -y
sudo apt install -y unzip make

sudo apt-get update
sudo apt-get install -y \
  ca-certificates \
  curl \
  gnupg \
  lsb-release

# Install docker
curl -fsSL https://download.docker.com/linux/ubuntu/gpg | sudo gpg --dearmor -o /usr/share/keyrings/docker-archive-keyring.gpg
echo \
  "deb [arch=$(dpkg --print-architecture) signed-by=/usr/share/keyrings/docker-archive-keyring.gpg] https://download.docker.com/linux/ubuntu \
  $(lsb_release -cs) stable" | sudo tee /etc/apt/sources.list.d/docker.list > /dev/null

sudo apt-get update
sudo apt-get install docker-ce docker-ce-cli containerd.io

# Enter Yes when prompted

sudo apt-get install -y docker-ce=5:20.10.12~3-0~ubuntu-bionic docker-ce-cli=5:20.10.12~3-0~ubuntu-bionic containerd.io

# Check docker version:
docker --version

# Output is something like:
# Docker version 20.10.17, build 100c701

# Install docker-compose
sudo curl -L "https://github.com/docker/compose/releases/download/1.29.2/docker-compose-$(uname -s)-$(uname -m)" -o /usr/local/bin/docker-compose
sudo chmod +x /usr/local/bin/docker-compose

# Check docker-compose version:
docker-compose --version
# Output is something like:
# docker-compose version 1.29.2, build 5becea4c

# Enable use of docker without sudo
sudo groupadd docker
sudo usermod -aG docker $USER
newgrp docker

# Verify docker runs without sudo
docker ps
CONTAINER ID    IMAGE    COMMAND   CREATED    STATUS    PORTS    NAMES

# Install creds-helper and create config to pull and run public aws ecr docker images
git clone https://github.com/awslabs/amazon-ecr-credential-helper.git
cd amazon-ecr-credential-helper && make docker
sudo mv ./bin/local/docker-credential-ecr-login /usr/local/bin/

# Check creds-helper version
docker-credential-ecr-login -v
# Output is something like:
# amazon-ecr-credential-helper
# Version:    0.6.0
# Git commit: 69c85dc22db6511932bbf119e1a0cc5c90c69a7f

# Create creds-helper config file
cd .. && mkdir ~/.docker
echo '{"credHelpers":{"public.ecr.aws":"ecr-login"}}' > ~/.docker/config.json

# Download Latest DoltLab
curl -O https://doltlab-releases.s3.amazonaws.com/linux/amd64/doltlab-latest.zip

# Unzip DoltLab
unzip doltlab-latest.zip -d doltlab
cd doltlab
Your DoltLab instance is now ready to start. The latest versions of DoltLab require a connection to an SMTP email server for users other than admin to be able to create accounts.
For this example, an AWS Simple Email Service is used, but other SMTP providers can be used as well. At the time of this writing, Azure does not provide an out-of-the-box SMTP service and recommends using third-parties.
To start DoltLab on the VM run:
HOST_IP=<vm public ip> \
EMAIL_HOST=<smtp host> \
EMAIL_USERNAME=<email username> \
EMAIL_PASSWORD=<email password> \
EMAIL_PORT=587 \
NO_REPLY_EMAIL=<no reply email address> \
POSTGRES_USER=dolthubapi \
POSTGRES_PASSWORD=<password> \
DOLTHUBAPI_PASSWORD=<password> \
./start-doltlab.sh
Once this completes, verify the services are all operating successfully by running:
docker ps
# You should see 7 services running
You can now view the running DoltLab by going to http://<HOST_IP> in your web browser.
Enable RDP access to the VM
To connect to the VM using an remote desktop protocol (RDP) connection, you'll need to install xrdp on the VM.
What is an RDP connection, you might be wondering? Wesley Chai and Brian Posey from techtarget.com provide a useful explanation:
Remote desktop protocol (RDP) is a secure network communications protocol developed by Microsoft. It enables network administrators to remotely diagnose problems that individual users encounter and gives users remote access to their physical work desktop computers.
RDP can be used by employees working from home or traveling who need access to their work computers. RDP is also often used by support technicians who need to diagnose and repair a user's system remotely and by admins providing system maintenance.
To use a remote desktop session, a user or admin must employ RDP client software to connect to the remote Windows PC or server running RDP server software. A graphical user interface enables the remote user or admin to open applications and edit files as if they were sitting in front of their desktop.
Having a graphical user interface connected to a VM is a pretty cool feature, so we'll set that up in our example DoltLab instance now.
Open a terminal and ssh into the VM. Run the following to install xrdp and other required dependencies:
# Install and enable xrdp
sudo apt-get update
sudo DEBIAN_FRONTEND=noninteractive apt-get -y install xfce4
sudo apt install xfce4-session
sudo apt-get -y install xrdp
sudo systemctl enable xrdp
sudo adduser xrdp ssl-cert
echo xfce4-session > ~/.xsession
sudo service xrdp restart

# Set user password for RDP client
sudo passwd azureuser
# Enter password
# Retype password
You can now go to the VM instance in the Azure portal and click “Connect” in the left-most menu. Select "RDP," set the IP address to the public IP address of the VM, and ensure the port number is 3389.
Download the RDP file and open it. This will open a remote desktop session connected to the VM. In the login window, enter the VM username and the password you created in the previous step:
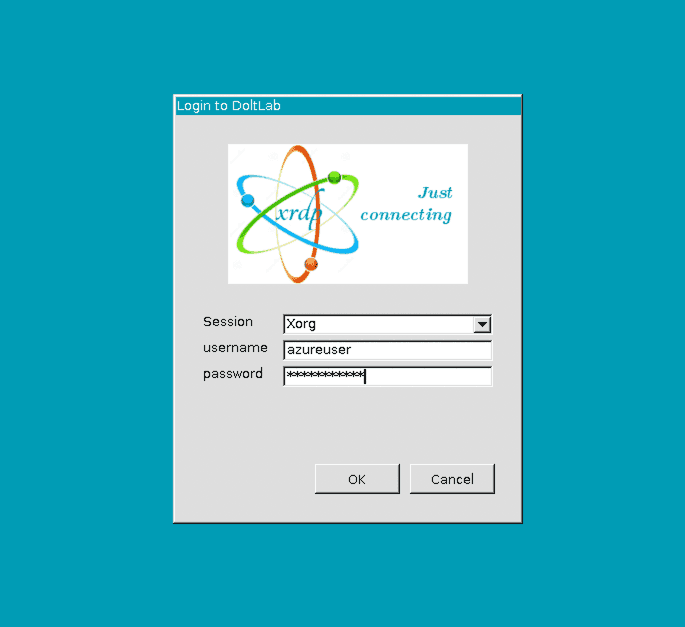
Once you're successfully logged in, you can use the the file-manager go view /home/<username>/doltlab to see the DoltLab files you downloaded earlier.

Using a remote PostgreSQL database
Earlier, when we started our DoltLab instance, it automatically provisioned and connected DoltLab to a PostgreSQL server Docker container running on the VM.
To use an external PostgreSQL server instead, the docker-compose.yaml file in the doltlab directory must be altered.
Open the docker-compose.yaml file in a text-editor, scroll down to the doltlabapi container and set the -pghost argument to the address of your external PostgreSQL server. Add the -pgport argument here as well, and set it to the port of your external PostgresSQL server, though this argument will default to 5432. Save these changes.
On your external PostgreSQL server, run the following lines of code to create a user for which the DoltLab instance can connect to the database:
CREATE ROLE dolthubapi WITH LOGIN PASSWORD '$DOLTHUBAPI_PASSWORD';
CREATE DATABASE dolthubapi;
GRANT ALL PRIVILEGES ON DATABASE dolthubapi TO dolthubapi;
CREATE EXTENSION citext SCHEMA public;
GRANT ALL PRIVILEGES ON ALL TABLES IN SCHEMA public TO dolthubapi;
ALTER DEFAULT PRIVILEGES IN SCHEMA public GRANT ALL ON TABLES TO dolthubadmin;
Now, when running the ./start-doltlab.sh script, your DoltLab instance will be connected to your external PostgreSQL server.
Conclusion
We love getting feedback, questions, feature requests, and cool how to guides from our community, so if there's anything you'd like to see added in DoltLab or in one of our other products, please don't hesitate to reach out.
You can checkout each of our different product offerings below, to find which ones are right for you:
- Dolt—it's Git for data.
- DoltHub—it's GitHub for data.
- DoltLab—it's GitLab for data.
- Hosted Dolt—it's RDS for Dolt databases.